In Part 2 (link), I shown the DIY steps to built up the reflector bowl for my beauty dish.
And in this Part 3, I show you the DIY steps to construct the flash bracket.
I use a 16mm wide by 3 mm thick Aluminium bar as my building material. I have all the tools require to work with aluminium. All parts will be fastened by bolts and nuts and no welding is required.
The idea of my flash bracket is simple: to hold the flash and the beauty dish in place onto a flash tripod. The bracket should be adjustable to suit different sizes of the flashes.
The bracket dimensions had been determined to suit for Sony flashes of F58am, F43am and F42am. Hence, the Aluminium bars were cut accordingly.
The bracket consists of two parts: the main supporting bar and the flash supporting bar. The main supporting bar is the bar that support the reflector bowl and the flash supporting bar. The flash supporting bar has a sliding mechanism so it could move up and down from the flash opening on the reflector bowl that suit the size of the flash it's used.
To construct the main support bar, an aluminium bar is cut.
In order to suit the gigantic size of F58am, a bar length of about 7 inches is required. The next step would be drilling two holes on one end of the bar so to fasten this bar to the reflector bowl, and the other end would be a strip of opening strip for sliding purposes.
A series of holes been drilled before turning these holes into sliding strip.
With a proper tool and effort and some muscle work, I'd turn the series of holes into a long strip.
Bend the end up to suit the curvature of the bowl. The bended end would be fastened onto the bowl with bolts and nuts as shown in the pic below:
The next one to do is the flash supporting bar. This bar would have another sliding mechanism so the flash could be adjusted according to the flash head size as well.
A bar with approximately 5 inches in length is cut.
Drill the holes and with some muscle work, make another slider strip as shown in the pic above.
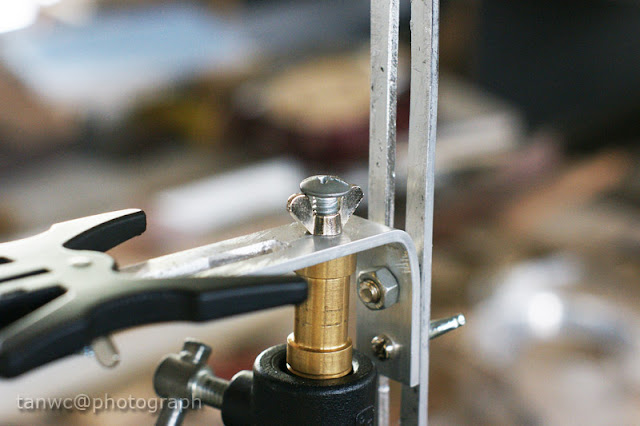
Bend up the end of the bar. The bend end will be connected to the supporting bar with bolt and butterfly nut. And the flash support bar is completed.
This is how it look when everything is fixed together.
How the flash stand is fixed onto the flash supporting bar.
And how the flash bracket is fixed onto the flash stand.
The next step would be the painting. I bought a can of black spray paint to paint the exterior of the beauty dish to make it look more elegant, and the spray white paint onto the internal of the beauty dish for better reflection. And walla, I have my own DIY beauty dish!
The beauty dish with F43am.
Beauty dish with F42am.
Beauty dish with F42am.
And test fire:
Yes, it doesn't throw that ugly shadow of the middle reflector!
And now I am happy. :D
My DIY beauty dish steps by steps:
:: Part 1 - The Design ::
:: Part 2 - The Bowl ::


3 comments:
Nice DIY Templar, I just read all 3part of the beauty dish posts.
Do you have photo of a F58 sony proprietary foot + adapter with remote trigger mounted on your Beauty dish?
Regards
Ezani79
When things get rough just stay calm and ask assistance from God and he'll give you peace. Visit my site for more information.
triciajoy.com
www.triciajoy.com
Syukur Alhamdulillah di tahun ini Saya mendapatkan Rezeki yg berlimpah sebab sudah hampir 10 Tahun Saya bekerja di (HONGKONG) tdk pernah menikmati hasil jeripaya saya karna Hutang keluarga Sangatlah banyak namun Akhirnya, saya bisa terlepas dari masalah Hutang Baik di bank maupun sama Majikan saya di Tahun yg penuh berkah ini,
Dan sekarang saya bisa pulang ke Indonesia dgn membawakan Modal buat Keluarga supaya usaha kami bisa di lanjutkan lagi,dan tak lupa saya ucapkan Terimah kasih banyak kepada AKI DARMO karna Beliaulah yg tlah memberikan bantuan kepada kami melalui bantuan Nomor Togel jadi sayapun berhasil menang di pemasangan Nomor di HONGKONG dan menang banyak
Jadi,Bagi Teman yg ada di group ini yg mempunyai masalah silahkan minta bantuan Sama AKI DARMO dgn cara TLFN di Nomor ;[082-310-142-255] percaya ataupun tdk itu tergantung sama anda Namun inilah kisa nyata saya-ATAU, KUNGJUNGGI, BLOG, AKI DARMO… >>> KLIK DISINI ANGKA TEMBUS 2D,3D,4D,5D,6D,7D,9D-<<<<
Post a Comment