I used to run a virtual router on my old XP desktop computer which I could create an internet shared WiFi hotspot in my home with a Asus WiFi adaptor. The virtual program come together with the adaptor. Some clicks away, and my old XP desktop computer could turn into a WiFi hotspot. With this setting, I could have internet access for both of my desktop and laptop computer.
However, after I upgraded to Windows 7, the virtual router program no longer useable as that program is designed for Windows XP. The reason why is not known; I've tried to install the program, but the program just couldn't run. This drop me to the idea of direct computer connection via ad-hoc connection.
Back then when I was a PC user, my mind was set at that PC and Mac would not communicate in a direct or in-direct way. I didn't know that to connect both PC and Mac through ad-hoc connection is possible. Even with some settings on PC and Mac would make an ad-hoc connection with internet access for both PC and Mac is possible.
I am using Celcom internet broadband service with my PC as my main computer. My PC, which is a Dell computer would be connected to Celcom broadband, and my Mac would access to internet via ad-hoc connection through my desktop PC. And I will show you how to set up an ac-hoc connection with internet access between a PC and a Mac.
Preparation
 This is my Asus Wifi adaptor. This adaptor would be plugged onto my PC as my WiFi transmitter. My Mac has its own AirPort as its WiFi receiver. Once the adaptor is plugged onto the computer, Windows 7 will set it up automatically. A wireless network connection will be created under my computer's network connections.
Network Setting Up
On my PC, I will set up a private network by bringing up the network windows as shown below:
 Double click on "Set up a new connection or network". Under "Choose a connection option", select "Set up a wireless ad hoc (computer-to-computer) network" and click "Next".
 One friendly explanation what is an ad-hoc connection is all about will be shown. Read it, or skip it by clicking "Next".
 In the next windows, the name of the ad-hoc network shall be named, and a password to be assigned for this network. In this example, select security type as "WEP" and I've named my network as "ExampleAdHoc". Give any name to your liking. A password has assigned to it. Check "Save this network" as well before click "Next".
If everything has done correctly, the next window will inform you that the network you have just created is ready to use.

To check if the network that has been created just now is ready to use, simply double click onto the wireless signal icon on the bottom right taskbar. A pop up windows will shown all wireless network that is available.
 A "Waiting for users" prompt indicates that the network is ready to use, and waiting for any computer that want to connect with it.
Proxies
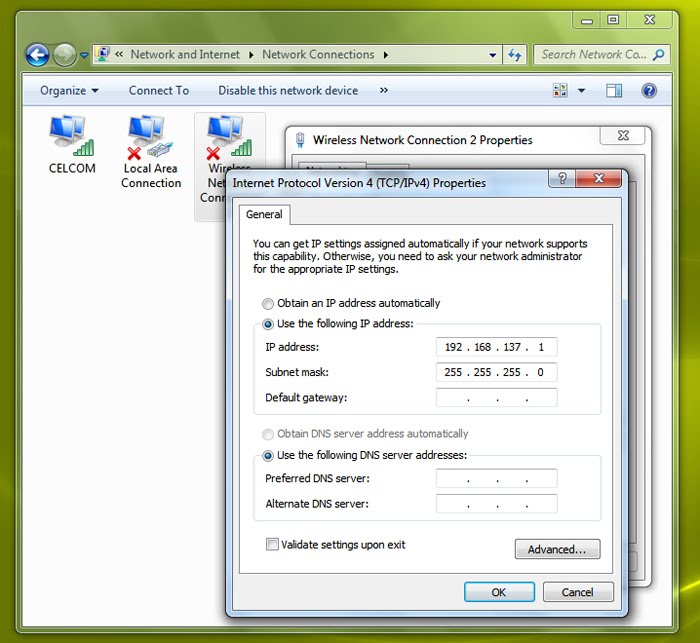
 Right click on the "Wireless Network Connection" (in my case, "Wireless Network Connection 2"), and select "Properties", under "Networking" tab, select "Internet Protocol Version 4 (TCP/IPv4)", and click on "Properties" button.
 Check "Use the following IP address:", and key in the IP addresses as shown:

 Under the Network window, select "Advanced..."
 Select "TCP/IP" tab, under "Configure IPv4", select "Manually" and key in the IP addresses as shown below:
 Click "OK", and click "Apply", and you are done !
The next step is to set up the proxies for the PC. This step is important as proxies will ensure that all computers within the same network would have a fix IP address and made internet access for other computers within the network possible.
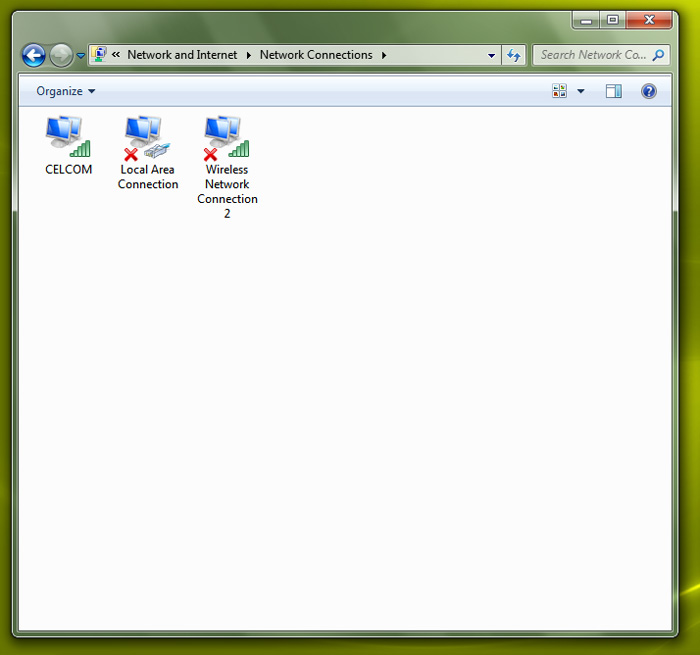
To set the PC's IP address, simply double click "Change adapter settings" that is located on the left hand side of the "Network and Sharing Center" window. A windows of "Network Connections" will be brought up as shown :
 Right click on the "Wireless Network Connection" (in my case, "Wireless Network Connection 2"), and select "Properties", under "Networking" tab, select "Internet Protocol Version 4 (TCP/IPv4)", and click on "Properties" button.
 Check "Use the following IP address:", and key in the IP addresses as shown:
Leave the "Default gateway" and "DNS severs" blank, click "Ok" and you are done with the proxies.
The next step is to share the internet connection via this wireless network that been created. This can be done by sharing the internet connection with the broadband services that is connected to my PC. I am using Celcom broadband service, hence what I did was under "Network Connections", left click the "Celcom" icon, choose properties, select "Sharing" tab, and check "Allow other network users to connect through this computer's Internet connection". Select the "Home networking connection" by choosing "Wireless Network Connection" as shown:

Click "OK" and you are done with my PC. My PC now is ready to be connected as a router for other computers as well.
Setting on Mac
Since my Mac would share the internet connection via PC, hence what I should do is to assign an IP address to my Mac and to assign the router IP address, which is my PC's IP address into my Mac's network setting.
To start, simply select the "System Preferences", and select "Network" under "Internet & Wireless" section.
 Under the Network window, select "Advanced..."Select "TCP/IP" tab, under "Configure IPv4", select "Manually" and key in the IP addresses as shown below:
 Click "OK", and click "Apply", and you are done !
Turn on your AirPort, and you should be able to find your network name under "Devices". Select and join the network that you've created, key in the password, and walla, you are ready to surf the internet from your Mac.